QUICK ANSWER
Thank you for reading this post, don't forget to subscribe!
The Mardi Himal trek itinerary is a 7-day walking route (9 days including arrival and departure) in Nepal’s Annapurna region. From the trailhead at Kande (1,770m) it climbs through Deurali, Forest Camp (2,600m) and High Camp (3,600m) to Mardi Himal Base Camp (4,500m), then descends to Siding village (1,750m) for the drive back to Pokhara. It is a moderate trek suitable for fit first-timers, best done in spring (March to May) or autumn (September to November). As of 2026, foreign trekkers must trek with a licensed guide and carry an ACAP permit.
On this page
- Mardi Himal trek at a glance
- Itinerary overview table
- Day-by-day itinerary
- Permits and the 2026 guide rule
- Best time to do this itinerary
- How hard is it? Difficulty and altitude
- Food, accommodation and cost on the trail
- Itinerary variations and add-ons
- Frequently asked questions
- Sources
The Mardi Himal trek is the shortest of the classic Annapurna teahouse trails, and for many people it delivers the best views per day of walking anywhere in Nepal. This guide lays out the exact mardi himal trek itinerary we recommend: a relaxed 7-day version that climbs gradually to Mardi Himal Base Camp at 4,500m, directly beneath the fluted summit of Machhapuchhre (Fishtail). Below you will find each day’s route, walking time, sleeping altitude and what to expect underfoot, followed by the permits, timing, difficulty and budget notes you need to plan the trip with confidence.
This is the pillar guide for our wider Mardi Himal series. Wherever a topic deserves its own deep dive, such as cost, permits, packing or altitude safety, we link out to the dedicated guide rather than repeating it here, so you can plan in whatever order suits you.
Mardi Himal trek at a glance
| Detail | Summary |
| Total duration | 9 days end to end (Kathmandu to Kathmandu), of which 5 are trekking days |
| Walking days | 5 days of trekking |
| Trailhead / exit | Start: Kande (1,770m). Exit: Siding village (1,750m) |
| Maximum altitude | Mardi Himal Base Camp, 4,500m |
| Difficulty | Moderate, suitable for fit beginners |
| Best seasons | Spring (Mar to May) and autumn (Sep to Nov) |
| Permits (2026) | ACAP permit, TIMS via agency, licensed guide mandatory for foreigners |
| Region | Annapurna Conservation Area, near Pokhara |
Itinerary overview table
Here is the full route in summary. Each day links to the detailed description further down the page.
| Day | Route | Altitude | Time |
| 1 | Arrival in Kathmandu | 1,400m | Transfer |
| 2 | Kathmandu → Pokhara | 820m | 6 to 8 hr drive / 25 min flight |
| 3 | Pokhara → Kande → Deurali | 1,770m → 2,100m | 1 hr drive + 4 to 5 hr walk |
| 4 | Deurali → Forest Camp | 2,600m | 5 to 6 hr walk |
| 5 | Forest Camp → High Camp | 3,600m | 5 to 6 hr walk |
| 6 | High Camp → Base Camp (4,500m) → High Camp | 4,500m | 6 to 7 hr walk |
| 7 | High Camp → Siding village | 1,750m | 4 to 5 hr walk |
| 8 | Pokhara → Kathmandu | 1,400m | 6 to 8 hr drive / 25 min flight |
| 9 | Final departure from Nepal | N/A | Departure |
Day-by-day itinerary
Day 1: Arrival in Kathmandu (1,400m)
Altitude: 1,400m Time: Airport transfer
Fly into Tribhuvan International Airport in Kathmandu, where your guide or agency representative will meet you and transfer you to your hotel in Thamel, the city’s traveller hub. The rest of the day is yours to recover from the flight, exchange currency, and pick up any last-minute trekking gear from the dozens of shops nearby.
In the evening, most operators hold a short briefing to confirm your itinerary, check your insurance details, and introduce your guide. This is the moment to ask questions about the route, your daily pace, and what to pack into your duffel versus your daypack. An early night helps, because tomorrow involves a long transfer to Pokhara.
TRAIL TIP: Use today to confirm your travel insurance covers high-altitude trekking and helicopter evacuation valid to at least 5,000m. The trek tops out at 4,500m, so you want margin above that.
Day 2: Kathmandu to Pokhara (820m)
Altitude: 820m Time: 6 to 8 hr drive or 25 min flight
Travel from Kathmandu to Pokhara, the lakeside city that serves as the gateway to the entire Annapurna region. The tourist bus along the Prithvi Highway takes six to eight hours and follows the Trishuli River through terraced hills and roadside villages. A flight covers the same distance in about 25 minutes and is worth considering if your schedule is tight.
Pokhara sits at just 820m beside Phewa Lake, with the Annapurna massif and Machhapuchhre rising directly behind the town on a clear day. Spend the afternoon relaxing by the lake, finalising permits if your agency has not already done so, and repacking for the trail. You will leave anything you do not need at your Pokhara hotel.
TRAIL TIP: Phewa Lakeside is the most convenient place to sort permits the day before you start, and it is also the last reliable ATM stop. There are no cash machines on the trail, so withdraw all the rupees you will need here.
Day 3: Pokhara to Kande to Deurali (2,100m)
Altitude: 1,770m → 2,100m Time: 1 hr drive + 4 to 5 hr walk
A short morning drive of about an hour takes you west out of Pokhara to the trailhead at Kande (1,770m) on the Pokhara to Baglung highway. From here the walking begins with a steady climb through Australian Camp and Pothana, small ridgetop settlements with sweeping views back over the Pokhara valley.
The trail then enters cool oak and rhododendron forest as it contours toward Pitam Deurali (2,100m), your stop for the night. This first day eases you onto the trail with a manageable four to five hours of walking and only a modest altitude gain, which is exactly what you want before the bigger climbs to come.
Deurali has a cluster of comfortable teahouses, and the forest setting is a gentle introduction to the moss-draped woodland that defines the lower half of this trek. If the weather is clear, you will get your first proper look at Machhapuchhre from the ridge.
TRAIL TIP: Walk at a conversational pace today even though the distance is short. Setting an easy rhythm on day one of trekking pays off later when the air thins above 3,000m.
Day 4: Deurali to Forest Camp (2,600m)
Altitude: 2,600m Time: 5 to 6 hr walk
Today is a beautiful, almost entirely forested stage. The trail rolls and climbs through dense rhododendron, oak and maple along the Mardi ridge, with the canopy opening now and then to frame Machhapuchhre and Annapurna South. In spring the rhododendrons bloom red and pink along this whole section, and it is one of the most photogenic parts of the trek.
After five to six hours of mostly shaded walking you reach Forest Camp (also called Kokar) at 2,600m, a small huddle of lodges tucked into the trees. The day’s elevation gain is moderate, but the cumulative climbing through the forest makes it feel like a solid day’s work.
Forest Camp can feel atmospheric and slightly damp because of its position deep in the woods, so it is worth claiming a lodge early and drying out any gear. Evenings here are quiet, cool and often misty.
TRAIL TIP: The forest holds moisture, so trekking poles help on the occasional muddy or root-laced sections, especially if there has been recent rain.
Day 5: Forest Camp to High Camp (3,600m)
Altitude: 3,600m Time: 5 to 6 hr walk
This is the day the landscape transforms. The trail climbs steadily out of the forest to Low Camp (around 2,970m), where the trees begin to thin and the high peaks come into full view. From Low Camp onward you walk along an increasingly open ridge, with Machhapuchhre looming ever larger ahead and Annapurna South filling the skyline.
Above the treeline the vegetation drops to shrubs and grasses, and the exposure increases. You gain a meaningful amount of altitude today, roughly a kilometre, finishing at High Camp (3,600m), perched dramatically on the ridge with one of the finest mountain panoramas of any teahouse in Nepal.
High Camp is where altitude starts to matter. Take the afternoon slowly, drink plenty of water, and watch for any headache or nausea. Sunset and sunrise from here, with the peaks glowing orange, are highlights of the whole trip.
TRAIL TIP: If you feel strong on arrival, a short acclimatisation stroll up the ridge toward the viewpoint helps your body adjust: climb a little higher, then come back down to sleep.
Day 6: High Camp to Mardi Himal Base Camp (4,500m) and back
Altitude: 4,500m Time: 6 to 7 hr walk
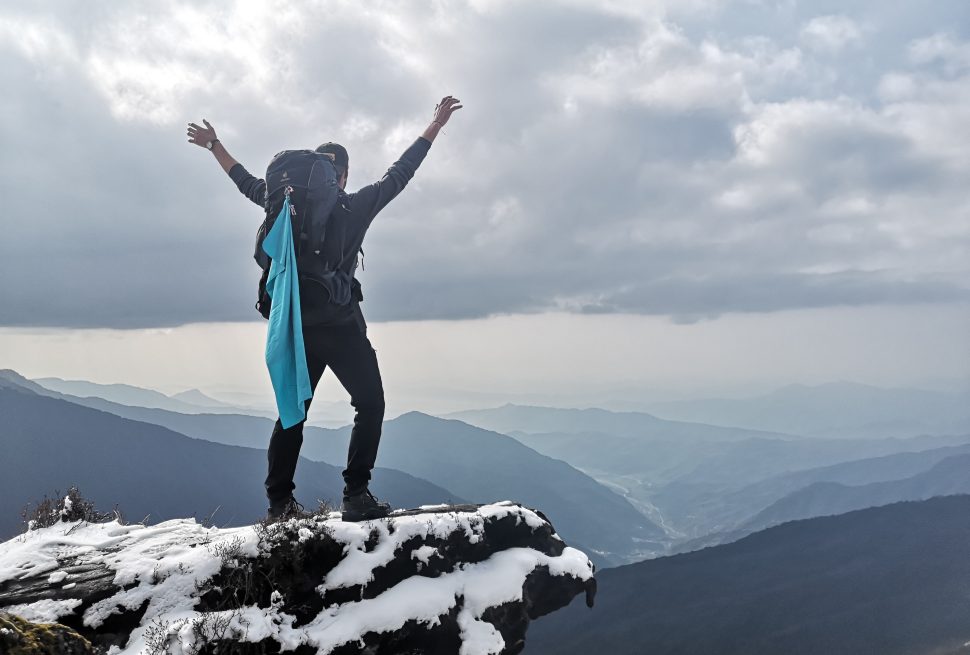
Today is the summit of the trek. You set off before dawn for the long ridge walk up to Mardi Himal Base Camp at 4,500m, also called the Upper Viewpoint. The trail is narrow and exposed in places as it follows the spine of the ridge, with the ground falling away on both sides, but it is non-technical and requires no climbing skills.
The reward at the top is an astonishing 360-degree amphitheatre of peaks: Machhapuchhre directly overhead, Annapurna South, Hiunchuli, Annapurna I, Gangapurna, Tent Peak and the serrated Mardi Himal itself. On a clear morning it is one of the great close-up mountain viewpoints in the Himalaya.
After soaking up the views and taking photographs, you retrace the ridge back down to High Camp for a second night, completing a round trip of roughly six to seven hours. Descending to sleep at a lower altitude than your day’s high point is good acclimatisation practice and helps you rest well.
TRAIL TIP: Start early. Clouds typically build by mid to late morning, so the clearest, most dramatic views are almost always in the first few hours after sunrise.
Day 7: High Camp to Siding village (1,750m)
Altitude: 1,750m Time: 4 to 5 hr walk
After a final morning on the high ridge, you begin the long, knee-working descent off the mountain. Rather than retracing the forest route you came up, this itinerary drops down the eastern flank toward Siding (also spelled Sidhing), a traditional Gurung village at 1,750m. The change of scenery is welcome: terraced fields, farmland and rural village life replace the high ridge.
The descent is steady and takes four to five hours, returning you firmly into the warmer, greener middle hills. Siding is an authentic working village with a handful of homestays and lodges, and staying here gives the trek a satisfying cultural bookend after the alpine high point.
From Siding a jeep road connects back to Pokhara. Depending on your itinerary and the day’s timing, you will either drive out to Pokhara this afternoon or stay the night in Siding and transfer in the morning.
TRAIL TIP: The long downhill is where most trekkers feel their knees. Shorten your poles for the descent and take the steep sections in a controlled, unhurried rhythm.
Day 8: Pokhara to Kathmandu (1,400m)
Altitude: 1,400m Time: 6 to 8 hr drive or 25 min flight
With the trek complete, return from Pokhara to Kathmandu by tourist bus or a short domestic flight. If you flew in to Pokhara and are short on time, flying back is again the comfortable option; the drive, while long, gives you a final scenic run along the river valleys.
Back in Kathmandu, the afternoon is free for a celebratory meal, last-minute souvenir shopping in Thamel, or simply resting. Many trekkers use this buffer day as insurance against any weather delays earlier in the trip, a sensible habit in the mountains.
TRAIL TIP; Keep one flexible day in your overall Nepal plan. Mountain weather can delay flights and even road transfers, and a spare day removes the stress of a tight onward connection.
Day 9: Final departure from Nepal
Altitude: N/A Time: Airport transfer
Your guide or agency will transfer you to Tribhuvan International Airport for your onward flight, usually a few hours before departure to allow for traffic and check-in. If your flight is later in the day, there may be time for a final breakfast or a quick visit to a nearby site before you head to the airport.
That completes the nine-day Mardi Himal itinerary, a short trek that punches far above its length in scenery and remains one of the best introductions to high-altitude trekking in Nepal.
Permits and the 2026 guide rule
IMPORTANT: 2026 RULE
As of 2026, foreign trekkers cannot legally do the Mardi Himal trek independently. Nepal’s mandatory guide policy, enforced since 1 April 2023, requires every non-Nepali trekker in the Annapurna Conservation Area to be accompanied by a licensed guide from a government-registered agency. The March 2026 change that allows solo trekkers in restricted areas does not apply to Mardi Himal, because this route runs under conservation-area rules, not restricted-area rules.
You need an Annapurna Conservation Area Permit (ACAP), which costs NPR 3,000 for foreign nationals (plus 13% VAT) and NPR 1,000 for SAARC nationals, and is free for children under 10. You can obtain it at the Nepal Tourism Board offices in Kathmandu (Bhrikutimandap) or Pokhara, through a registered agency, or via the NTNC online e-permit portal.
A TIMS card is technically still listed for the Annapurna region, but in practice most checkpoints in 2026 are verifying the ACAP permit and your guide’s credentials rather than TIMS. The old Green independent TIMS card has been abolished, so any TIMS card is now issued through your agency. Your operator will advise whether to arrange one for your departure.
For the full breakdown of fees, where to buy, the local municipality charge and the latest enforcement notes, see our Mardi Himal Trek Permit Guide.
Best time to do this itinerary
This itinerary works best in the two main trekking seasons. Spring (March to May) brings the rhododendron forests into bloom and generally stable weather, with warmer days as the season progresses. Autumn (late September to November) offers the clearest skies of the year and crisp mountain views, which is why it is the most popular window.
Winter (December to February) is doable on this short route but cold at High Camp and Base Camp, with the risk of snow on the upper ridge. The summer monsoon (June to August) brings rain, leeches in the forest and frequently clouded-out peaks, so most trekkers avoid it.
We compare temperatures, crowds and views month by month in our best time to trek Mardi Himal guide.
How hard is it? Difficulty and altitude
Mardi Himal is rated moderate. The daily walking of four to seven hours is well within reach of anyone with reasonable fitness, and there is no technical terrain or climbing involved. The two factors that make it more demanding than its short length suggests are the altitude at High Camp and Base Camp, and the long, steep descent to Siding on the final day.
Because you climb from 1,770m to 4,500m over just a few days, altitude sickness is a real consideration above 3,000m. This itinerary builds in a sensible profile, climbing high to Base Camp and returning to sleep lower at High Camp, but you should still know the symptoms and pace yourself.
See our Mardi Himal difficulty guide for fitness preparation, and our altitude sickness guide for prevention and what to do if symptoms appear.
Food, accommodation and cost on the trail
You sleep in teahouses (simple mountain lodges) every night on the trail. Rooms are basic twin-share with shared bathrooms, and the menus revolve around dal bhat, noodles, fried rice, soups, eggs and hot drinks. Prices rise with altitude because everything is carried or portered up, so a meal at High Camp costs noticeably more than the same dish lower down.
A guided Mardi Himal trek typically falls in the budget-to-mid range compared with longer Annapurna routes, mainly because it is so short. Your main costs are the guide, permits, transport to and from Pokhara, and your food and lodging on the trail.
For a full nightly breakdown see our food and accommodation guide, and for a complete budget with sample totals see the Mardi Himal cost guide. Pack smart with our Mardi Himal packing list.
Itinerary variations and add-ons
This nine-day plan is the comfortable, well-paced version, but the trek is flexible.
Shorter (5 to 6 days): Fit trekkers sometimes combine Deurali and Forest Camp into a single push, or start higher, trimming the trail to five or six days. This raises the daily altitude gain and gives less margin for acclimatisation.
Alternative exit via Lwang: Some itineraries descend toward Lwang Ghalel instead of Siding, passing tea gardens and Gurung villages. Both exits return you to Pokhara by road.
Combine with Australian Camp sunrise: Adding a night near Australian Camp or Dhampus at the start gives an easy first morning and a famous sunrise over the Annapurnas.
Extra acclimatisation night: Adding a second night at Low Camp or High Camp is the simplest way to make the trek safer if you are altitude-sensitive or new to trekking above 3,500m.
Frequently asked questions
How many days is the Mardi Himal trek?
The full itinerary is 9 days from Kathmandu to Kathmandu, which includes arrival and departure days plus the Pokhara transfers. On the trail itself there are 5 days of trekking. Fit trekkers can shorten the walking portion to 4 days, while adding acclimatisation nights extends it slightly.
What is the maximum altitude of the Mardi Himal trek?
The highest point is Mardi Himal Base Camp, also called the Upper Viewpoint, at 4,500m. You reach it on a morning round trip from High Camp (3,600m) and then descend to sleep, which helps acclimatisation. The trek involves no technical climbing to reach this altitude.
Is the Mardi Himal trek difficult?
It is rated moderate. The trails are non-technical and daily walking is 4 to 7 hours, so reasonably fit beginners manage it well. The harder parts are the thin air above 3,000m and the long, steep descent to Siding on the final day. Trekking poles and a steady pace make a big difference.
Do I need a guide for the Mardi Himal trek in 2026?
Yes. Since April 2023 and through 2026, all foreign trekkers in the Annapurna Conservation Area must trek with a licensed guide from a registered agency. Independent solo trekking is not permitted on this route, and the 2026 rule change for restricted areas does not apply to Mardi Himal.
What permits do I need for the Mardi Himal trek?
You need an ACAP permit (NPR 3,000 for foreigners plus VAT, NPR 1,000 for SAARC nationals). A TIMS card is technically listed for the region but inconsistently checked in 2026, and is arranged through your agency. Your guide and agency handle the paperwork as part of a guided trip.
When is the best time for the Mardi Himal trek?
Spring (March to May) and autumn (September to November) are best. Autumn gives the clearest skies, while spring brings blooming rhododendrons. Winter is cold with possible snow up high, and the summer monsoon brings rain, leeches and clouded views, so most trekkers avoid it.
Where does the Mardi Himal trek start and finish?
The trek starts at Kande (1,770m), about an hour’s drive west of Pokhara, and finishes by descending to Siding village (1,750m), from where a jeep road returns you to Pokhara. Both the start and end points are easily reached from Pokhara’s lakeside.
Is Mardi Himal suitable for beginners?
Yes, for fit first-time trekkers. There is no technical terrain, the route is short, and the itinerary climbs gradually with a sleep-low profile near the top. Beginners should prepare with regular cardio and hill walking, and consider adding an acclimatisation night if new to altitude.
How long is the Mardi Himal trek in kilometres?
The trekking portion covers roughly 35 to 40 km in total across the walking days, though the exact distance varies with where you start and which exit you use. Because much of the route climbs and descends a steep ridge, the daily effort matters more than the flat distance on a map.
Where do you sleep on the Mardi Himal trek?
You stay in teahouses, which are simple family-run mountain lodges, every night on the trail. Rooms are usually basic twin-share with shared bathrooms. The higher lodges at High Camp are more spartan and colder than those lower down, so a warm sleeping bag is worth carrying above Forest Camp.
Do I need travel insurance for the Mardi Himal trek?
Yes. You should carry travel insurance that explicitly covers high-altitude trekking and helicopter evacuation valid to at least 5,000m, since the trek reaches 4,500m. Standard holiday policies often exclude trekking above 3,000m or 4,000m, so check the altitude limit carefully before you travel.
Is there mobile signal, wifi or charging on the trail?
Coverage is patchy. Nepali networks reach some points along the lower trail and parts of High Camp, but signal is unreliable above the treeline. Most lodges offer paid charging and sometimes paid wifi. Carry a power bank and do not rely on a connection at the upper camps.
How much does the Mardi Himal trek cost?
Because it is short, Mardi Himal is one of the more affordable Annapurna treks. Your main costs are the licensed guide, the ACAP permit, transport to and from Pokhara, and food and lodging on the trail. See our cost guide for sample budgets at different comfort levels.
What mountains can you see from Mardi Himal Base Camp?
The Base Camp viewpoint gives a close, almost overhead view of Machhapuchhre (Fishtail), along with Annapurna South, Hiunchuli, Annapurna I, Gangapurna, Tent Peak and Mardi Himal itself. On a clear morning it is one of the finest close-up mountain panoramas in the Annapurna region.
Are there ATMs on the Mardi Himal trek?
No. There are no ATMs anywhere on the trail. The nearest reliable cash machines are in Pokhara Lakeside, about an hour from the Kande trailhead. Withdraw all the rupees you expect to need before leaving Pokhara, including a buffer for drinks, charging, hot showers and tips.
Can children do the Mardi Himal trek?
Active children who are used to walking can manage Mardi Himal with a slow, flexible plan and close attention to altitude. The climb above 3,000m affects children too, so build in extra rest, watch for symptoms, and be ready to descend if needed. Discuss the trip with your guide and ideally a doctor beforehand.
How do I get to the Mardi Himal trailhead?
The trek starts at Kande, roughly an hour by road west of Pokhara on the Pokhara to Baglung highway. Most trekkers take a private vehicle or a shared jeep arranged by their agency. From the Siding exit at the end of the trek, a jeep road connects back to Pokhara in a few hours.
Mardi Himal or Annapurna Base Camp: which should I choose?
Mardi Himal is shorter, quieter and climbs a scenic ridge to 4,500m, which makes it ideal if you have limited time. Annapurna Base Camp is longer, busier and takes you into a glacial amphitheatre at 4,130m. Both are moderate teahouse treks in the same conservation area, so the choice usually comes down to time and crowds.
Sources
Permit fees, the mandatory-guide rule and TIMS status were verified for the 2026 season against the following:
- Nepal Tourism Board, TIMS card information
- Annapurna Conservation Area Project / National Trust for Nature Conservation, ACAP permit rules
- 2026 regional permit updates confirming the mandatory licensed-guide policy in conservation areas